Introduction
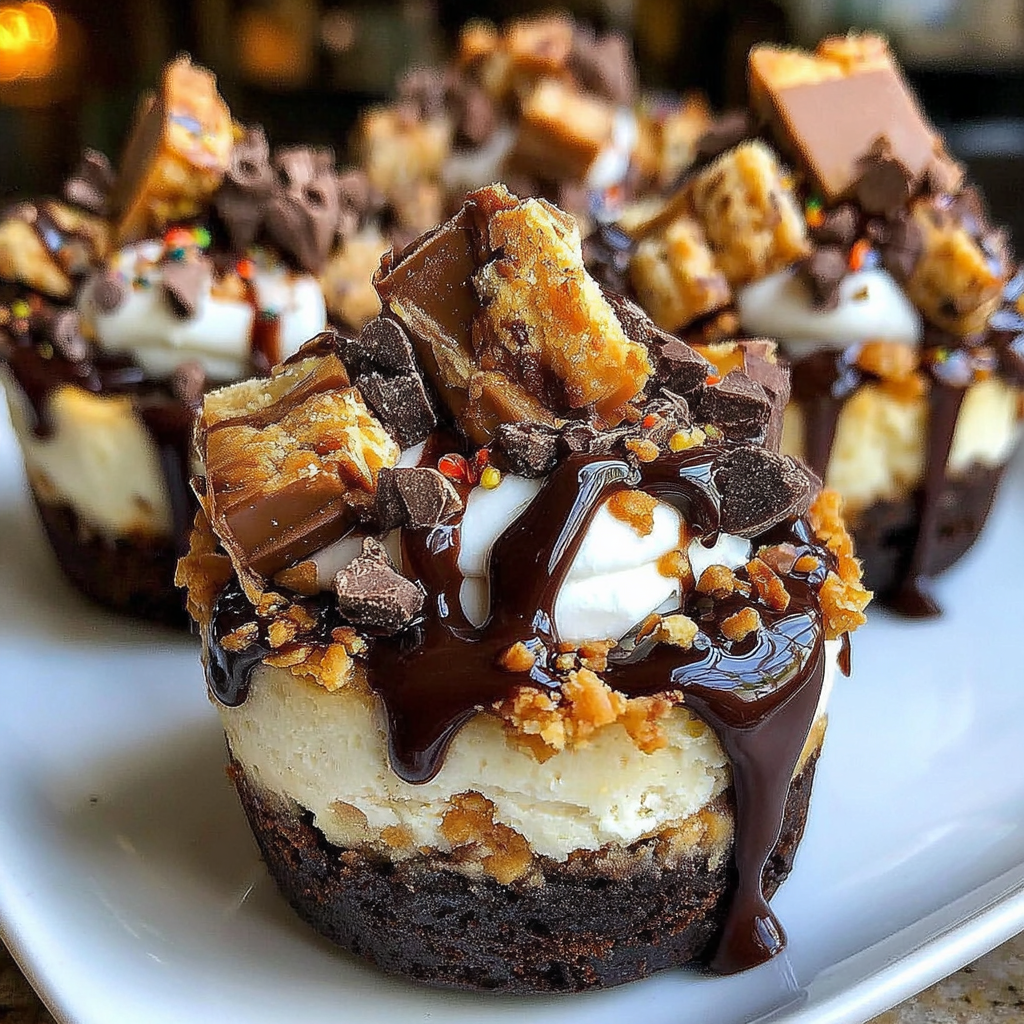
There’s something delightfully decadent about combining brownie and cheesecake into a single bite-sized treat. These Loaded Brownie Cheesecake Cups deliver that rich experience with ease, making them perfect for gatherings or a special dessert at home.
Whether you’re celebrating a birthday, hosting friends, or treating yourself, these cups are sure to impress. Their layered texture offers a pleasing contrast, and you can customize the toppings for an extra personal touch!
Ingredients
- 1 cup all-purpose flour
All-purpose flour forms the base structure of the brownie layer. It helps bind the ingredients together and provides the necessary stability to hold the layers. - 1/2 cup unsweetened cocoa powder
Cocoa powder adds rich chocolate flavor to the brownies. It gives the dessert its deep color and enhances the overall chocolate experience. - 1/4 teaspoon salt
Salt enhances the flavors in both the brownie and cheesecake layers. It also balances the sweetness, ensuring that the dessert is not overly sugary. - 1/2 cup unsalted butter, melted
Melted butter provides moisture and richness to the brownie batter. It helps achieve that fudgy texture that is characteristic of a great brownie. - 3/4 cup granulated sugar
Sugar sweetens the brownie layer and contributes to the overall texture. It helps create a tender crumb and a beautifully shiny crust. - 2 large eggs
Eggs act as a binder, helping to hold all the ingredients together. They also add moisture and richness, which is essential for a successful brownie. - 1 teaspoon vanilla extract
Vanilla extract enhances the flavor profile, adding warmth and depth to the brownies. It balances the bitterness of the cocoa and elevates the overall taste experience. - 8 oz cream cheese, softened
Cream cheese forms the main component of the cheesecake layer, providing a rich and creamy texture. It also contributes to the tangy flavor that contrasts nicely with the sweet brownie. - 1/4 cup powdered sugar
Powdered sugar sweetens the cheesecake filling without adding graininess. It dissolves easily, creating a smooth and creamy texture. - 1/2 teaspoon lemon juice
Lemon juice adds a touch of acidity that brightens the flavor of the cheesecake. It also helps to balance the sweetness of the cream cheese and sugar. - 1/2 cup chocolate chips
Chocolate chips are an optional but delicious addition to both the brownie and cheesecake layers. They add another layer of chocolate flavor and texture. - Whipped cream for topping
Whipped cream adds a light, airy topping to finish off each cup. It enhances the dessert’s visual appeal and softens the rich flavors. - Your choice of toppings (e.g., nuts, caramel drizzle, sprinkles)
Toppings personalize and elevate these cups, allowing you to cater to different tastes and preferences, while also adding interesting textures.
Directions & Preparation
Step 1: Preheat the oven to 350°F (175°C).
Preheating the oven ensures that your brownies start baking as soon as they hit the pan, which helps to maintain the desired fudgy texture. An adequately preheated oven also contributes to even baking.
Step 2: Line a muffin tin with cupcake liners and set aside.
Using cupcake liners will make it easier to remove the brownie cheesecake cups after baking. It also adds a decorative element and prevents sticking.
Step 3: In a medium bowl, combine flour, cocoa powder, and salt.
Mixing the dry ingredients together first ensures even distribution of the cocoa and flour, preventing clumps. This preparation is key to achieving a consistent brownie texture.
Step 4: In a large bowl, whisk together melted butter and granulated sugar until smooth.
Whisking the butter and sugar together aerates the mixture and helps dissolve the sugar, contributing to a shiny top for the brownies. It also ensures that the sugar is well incorporated.
Step 5: Add eggs, one at a time, and mix in vanilla extract until fully combined.
Adding eggs one at a time helps to better integrate them into the mixture, which helps create a homogenous batter. The addition of vanilla enhances the flavor and aroma.
Step 6: Gradually add the dry ingredients to the wet mixture, stirring gently until combined.
Mixing the dry ingredients into the wet mixtures slowly prevents overmixing, which can lead to a tough brownie. It’s important to stir just until no floury streaks remain.
Step 7: Fold in chocolate chips, if using, to the brownie batter.
Folding in the chocolate chips at the end preserves their shape and doesn't break them up too much. They will melt slightly during baking, enhancing the chocolate experience.
Step 8: Divide the brownie batter evenly among the prepared muffin cups, filling each about halfway.
Filling the cups halfway allows enough room for the cheesecake layer to sit on top. This balancing act is crucial for creating distinct layers in each cup.
Step 9: In another bowl, beat the softened cream cheese until smooth and creamy.
Beating the cream cheese until smooth eliminates lumps which can ruin the silky cheesecake layer. It’s also the base for incorporating air, which results in a lighter filling.
Step 10: Add powdered sugar and lemon juice; mix until fully combined and smooth.
Incorporating powdered sugar with the cream cheese creates a sweetened cream cheese layer. The lemon juice adds acidity which enhances the flavor and balances out the sweetness.
Step 11: Carefully spoon the cheesecake mixture onto the brownie batter, filling each cup to the top.
Layering the cheesecake over the brownie allows both flavors to meld together during baking. Ensuring even distribution will create uniform cups.
Step 12: Bake in the preheated oven for 20-25 minutes, or until the edges are set but the center is still slightly jiggly.
Baking until the edges are set allows for a stable cup structure, while leaving the center slightly jiggly helps maintain a creamy, decadent texture after cooling.
Step 13: Let the cups cool in the tin for about 10 minutes before transferring to a wire rack to cool completely.
Cooling the cups in the tin prevents them from breaking during removal. After allowing them to cool slightly, transfer them to a wire rack to cool completely without becoming soggy.
Step 14: Top with whipped cream and your choice of toppings just before serving.
Adding the toppings right before serving keeps the whipped cream light and airy, avoiding deflation. It gives a fresh look while allowing for creative customization.

The Secret to Fudgy Brownies
For that ideal brownie texture, the key is to not overmix the batter and avoid overbaking. The perfect brownie is chewy and fudgy, with a decadent consistency, which is achieved through the right balance of ingredients and careful baking. Using melted butter instead of creaming with sugar is also crucial, as it helps in attaining that signature texture and flavor.
Perfect Cheesecake Layering
An important aspect of the cheesecake filling is to ensure that your cream cheese is softened adequately. This allows for a smooth mixing process, avoiding lumps that could ruin the creaminess. Also, remember that adding a hint of acidity, like lemon juice, not only elevates the flavor but also interacts beautifully with the sweetness, creating a delightful contrast.
Customizing Your Cups
These cups are incredibly versatile; feel free to experiment with various toppings or even add mix-ins to the cheesecake layer. Think crushed candy bars, fruit preserves, or even a layer of cookie crumbs. Personalizing toppings allows for unique flavor combinations tailored to your preferences, transforming each cup into a distinctive treat.
FAQs
What if my brownie mixture is too thick?
If your brownie mixture seems too thick, add a tablespoon of milk or water to loosen it gently. Stir until the desired consistency is reached before filling the muffin cups.
Can I substitute cream cheese for Greek yogurt?
While Greek yogurt can provide a lighter option, it will change the flavor and texture slightly. The cheesecake layer will be tangier and less creamy compared to using cream cheese.
What can I do if the cheesecake layer cracks during baking?
Cracking can occur if the oven temperature is too high or if the cheesecake is overbaked. Ensure your oven temperature is accurate and remove the cups when the centers are just slightly jiggly.
Is it necessary to use cupcake liners?
Using cupcake liners makes it easier to remove the brownie cheesecake cups, but you can grease the muffin tin directly instead. Just be cautious when removing them to avoid breaking.
Can I make these cups in mini sizes?
Yes, you can use a mini muffin tin for smaller servings. Adjust the baking time to around 15-20 minutes, checking for a similar jiggly consistency in the center.
What if I want to reduce the sweetness?
To cut down the sweetness, you can decrease the amount of sugar in both the brownie and cheesecake layers by up to 1/4 cup without compromising overall texture and flavor.
Conclusion
Creating Loaded Brownie Cheesecake Cups is an enjoyable process that results in an indulgent dessert sure to delight chocolate lovers. With a perfect blend of textures and flavors, these cups are a must-try for any occasion.
Whether you enjoy them at a festive gathering or a quiet evening at home, the satisfaction they bring is unmatched. So gather your ingredients and let the baking begin!
Recipe Card

Indulgent Loaded Brownie Cheesecake Cups
Ingredients
Method
- Preheat the oven to 350°F (175°C).
- Line a muffin tin with cupcake liners and set aside.
- In a medium bowl, combine flour, cocoa powder, and salt.
- In a large bowl, whisk together melted butter and granulated sugar until smooth.
- Add eggs, one at a time, and mix in vanilla extract until fully combined.
- Gradually add the dry ingredients to the wet mixture, stirring gently until combined.
- Fold in chocolate chips, if using, to the brownie batter.
- Divide the brownie batter evenly among the prepared muffin cups, filling each about halfway.
- In another bowl, beat the softened cream cheese until smooth and creamy.
- Add powdered sugar and lemon juice; mix until fully combined and smooth.
- Carefully spoon the cheesecake mixture onto the brownie batter, filling each cup to the top.
- Bake in the preheated oven for 20-25 minutes, or until the edges are set but the center is still slightly jiggly.
- Let the cups cool in the tin for about 10 minutes before transferring to a wire rack to cool completely.
- Top with whipped cream and your choice of toppings just before serving.
Notes
Additional serving suggestions: pair with a crisp salad, garlic bread, or roasted seasonal vegetables for balance.
For make-ahead, prep components separately and assemble just before heating to preserve texture.
Taste and adjust with acid (lemon/vinegar) and salt right at the end to wake up flavors.