Introduction
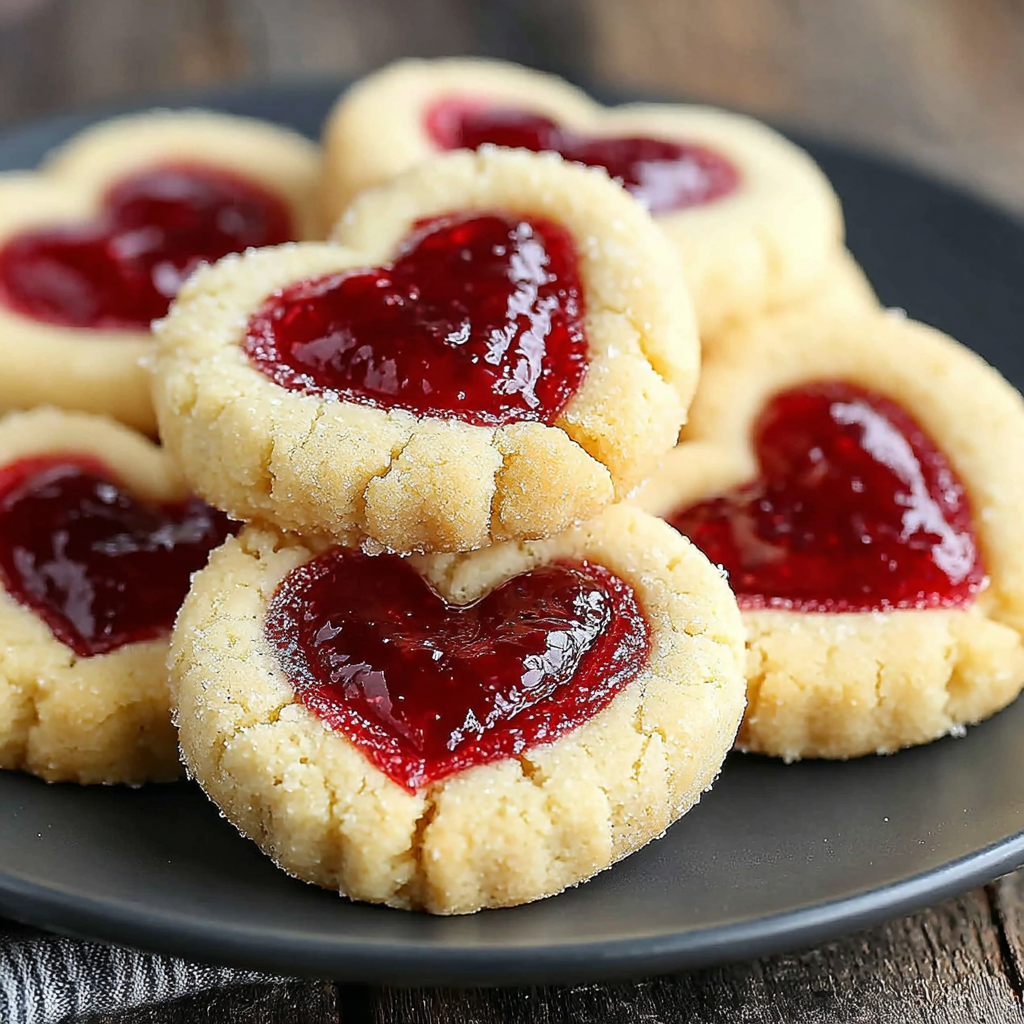
Heart Jam Thumbprint Cookies are a delightful treat that combines buttery goodness with a dollop of sweet, fruity jam. Perfect for celebrations or cozy gatherings, these cookies are bound to bring smiles.
Their unique shape and vibrant colors add a touch of charm, representing a heartfelt gesture. Whether you craft them for Valentine's Day or bake a batch just because, they're a wonderful way to express creativity in the kitchen.
Ingredients
- 1 cup unsalted butter, softened
Butter adds richness and moisture to the cookies. Using unsalted butter allows you to control the saltiness, resulting in a more balanced flavor profile. - 1/2 cup granulated sugar
Granulated sugar contributes to the sweetness while also giving the cookies a nice texture. It helps the cookies to spread in the oven and creates a delicate crumb. - 1/4 cup brown sugar, packed
Brown sugar adds a subtle caramel flavor due to its molasses content, helping to keep the cookies moist and chewy. - 2 large eggs
Eggs act as a binding agent, providing structure to the cookies. The yolks add richness, while the whites help with leavening and stability. - 2 cups all-purpose flour
All-purpose flour is the main structure-building component in cookies. It ensures that the cookies hold their shape while contributing to the overall texture. - 1/2 teaspoon baking powder
Baking powder acts as a leavening agent, helping the cookies to rise and create a light, tender crumb. - 1/4 teaspoon salt
Salt enhances the flavors in the cookies, balancing the sweetness and emphasizing the other ingredients, providing depth to the taste. - 1 teaspoon vanilla extract
Vanilla extract adds a warm, aromatic quality to the cookies. It enriches the overall flavor, making each bite irresistible. - 1/2 cup fruit jam or preserves (like raspberry or apricot)
Jam adds sweetness, moisture, and fruitiness to the cookies. The bright color and flavor contrast beautifully with the rich cookie base.
Directions & Preparation
Step 1: Preheat the oven to 350°F (175°C).
Preheating is crucial to ensure that the cookies bake evenly from the moment they enter the oven. An adequately heated oven helps the cookies to rise properly and maintain their shape, creating a desirable texture.
Step 2: In a large bowl, cream together the softened butter, granulated sugar, and brown sugar until light and fluffy.
Creaming these ingredients aerates the mixture, incorporating air for a lighter cookie texture. The creamed mixture should appear pale and fluffy, which indicates that you have successfully incorporated enough air for optimal results.
Step 3: Add the eggs one at a time, beating well after each addition. Stir in the vanilla extract.
Adding the eggs gradually ensures better emulsification and a smoother batter, improving the cookie's texture. Beating well after adding eggs allows for thorough incorporation, creating a uniform mixture.
Step 4: In a separate bowl, whisk together the flour, baking powder, and salt.
Whisking the dry ingredients ensures even distribution of the leavening agent and salt, preventing any clumping. This step also helps to aerate the flour, contributing to the final cookie texture.
Step 5: Gradually add the dry mixture to the butter and sugar mixture, mixing until just combined.
Mixing the dry and wet ingredients together helps prevent overworking the dough, which could result in tough cookies. Optimal mixing creates a cohesive dough without developing excessive gluten.
Step 6: Using a tablespoon or cookie scoop, portion out the dough and roll into balls. Place them on a baking sheet lined with parchment paper.
Rolling the dough into uniform balls ensures that the cookies bake evenly. Leaving some space between the cookies on the baking sheet allows for proper air circulation, which contributes to even baking.
Step 7: Using your thumb, gently press a well into the center of each cookie ball.
Creating a well is essential for holding the jam, providing a delightful burst of flavor in every bite. Be careful not to press too hard; the well should be deep enough to hold the jam without compromising the cookie's structure.
Step 8: Fill each well with about 1 teaspoon of your chosen jam.
Adding jam at this stage ensures it bakes into the cookie rather than melting off the sides. The choice of jam can express personal preference, adding a unique flavor to each batch of cookies.
Step 9: Bake in the preheated oven for 12-15 minutes or until the edges are lightly golden.
Baking time is crucial to achieving the perfect texture; underbaking can leave the cookies too soft, while overbaking can dry them out. Keep an eye on the cookies, allowing them to cool slightly once out of the oven.
Step 10: Allow the cookies to cool on the baking sheet for 5 minutes before transferring to a wire rack to cool completely.
Cooling the cookies on the baking sheet first helps them set and prevents breakage during transfer. A wire rack allows air circulation, enabling the cookies to cool evenly without becoming soggy.

Choosing the Right Jam for Your Cookies
The flavor of jam plays a pivotal role in the overall taste of Heart Jam Thumbprint Cookies. Opt for vibrant, high-quality fruit preserves that resonate with your personal taste. While classic choices like raspberry or apricot are delightful, consider experimenting with unique flavors like green tea or hibiscus to create a signature cookie. The selection of jam can set the mood for any occasion, making your cookies truly stand out.
Enhancing Texture with Add-Ins
To elevate the texture of your Heart Jam Thumbprint Cookies, think about adding nuts or oats. Chopped almonds, walnuts, or pecans can introduce a crunchy contrast that complements the soft cookies beautifully. Alternatively, incorporating rolled oats can offer a heartier feel while adding a nutty flavor. These add-ins not only enhance the overall taste but also provide visual interest, turning ordinary cookies into a gourmet treat.
Decorating Your Cookies for a Personal Touch
Consider decorating your Heart Jam Thumbprint Cookies for an extra layer of charm. A light dusting of powdered sugar can add an elegant finish, while drizzling melted chocolate creates an eye-catching design. For a festive touch, brighten up your cookies with colorful sprinkles or edible glitter. Personalizing the appearance of your cookies can make them an even more cherished gift or centerpiece for any occasion.
FAQs
What if my cookie dough is too crumbly?
If the dough is crumbly, it may need a bit more moisture. Add a teaspoon of milk or water gradually until the texture comes together.
Can I use alternative sweeteners in this recipe?
Yes, you can substitute granulated sugar with alternatives like coconut sugar or a stevia blend, but keep in mind they may alter the taste and texture slightly.
Why are my cookies spreading too much during baking?
Excessive spreading could be due to too much butter or not enough flour. Ensure precision in measuring your ingredients, and consider chilling the dough briefly before baking.
How can I make my jam thicker in the cookies?
If your jam is too runny, consider cooking it down on low heat until it thickens before using. Alternatively, you can use a preserves variety that has less moisture.
What should I do if the cookies are not holding their shape?
If the cookies lose their shape, you might have overmixed the dough or not given the butter the right temperature. Ensure the butter is softened, not melted, and mix just until combined.
What other fruits can I use besides jam?
You can use fruit curds, chocolate ganache, or even peanut butter as fillings. Just ensure they have a similar consistency to jam for proper baking.
Why do my cookies taste bland?
If your cookies taste bland, you may need to enhance their flavor with a pinch of salt or additional vanilla extract. Taste testing the dough before baking can help you adjust the sweetness.
Conclusion
Heart Jam Thumbprint Cookies are an enchanting way to celebrate culinary creativity while indulging in a delightful treat. Each bite is a perfect harmony of texture and flavor, with the sweet jam inviting you to savor every moment.
Whether shared at gatherings or enjoyed in solitude, these cookies serve as a reminder that the best bites are often those filled with love. So gather your ingredients, invite a friend, and embark on a joyful baking adventure.
Recipe Card

Indulgent Kahlua Chocolate Cakes for Chocolate Lovers
Ingredients
Method
- Preheat the oven to 350°F (175°C).
- Grease and flour two 9-inch round cake pans.
- In a large mixing bowl, combine the flour, sugar, cocoa powder, baking soda, and salt.
- In another bowl, whisk together the eggs, melted butter, Kahlua, and vanilla extract.
- Add the wet mixture to the dry ingredients and mix until just combined.
- Divide the batter evenly between the prepared pans.
- Bake for 25-30 minutes or until a toothpick inserted comes out clean.
- Allow the cakes to cool in the pans for 10 minutes, then transfer to a wire rack to cool completely.
- While cooling, make the frosting by whipping together the powdered sugar, heavy cream, and Kahlua.
- Once cooled, frost the tops of one cake layer, place the second layer on top, and frost the top and sides.
- Let the cake sit for about 30 minutes before serving.
Notes
Additional serving suggestions: pair with a crisp salad, garlic bread, or roasted seasonal vegetables for balance.
For make-ahead, prep components separately and assemble just before heating to preserve texture.
Taste and adjust with acid (lemon/vinegar) and salt right at the end to wake up flavors.