Introduction
Red velvet thumbprint cookies are a delightful twist on classic thumbprint cookies, blending the rich flavors of chocolate and vanilla with a distinct red hue. These cookies not only bring a touch of elegance to your dessert table, but they also offer a unique, chewy texture that is simply irresistible.
Perfect for special occasions or simply to satisfy your sweet tooth, these cookies are as fun to make as they are to eat. With a smooth cream cheese filling that complements the soft cookie base, each bite delivers a symphony of flavors that will have everyone reaching for another.
Ingredients
- 2 1/2 cups all-purpose flour
All-purpose flour provides the structure needed for the cookies, offering a perfect balance between softness and chewiness. It allows the cookies to hold their shape while still yielding a tender bite. - 1 tablespoon cocoa powder
Cocoa powder adds a subtle chocolate flavor to the red velvet cookies, contributing to their distinctive taste without overwhelming the red color. It is key to achieving the characteristic velvety texture. - 1 teaspoon baking powder
Baking powder is a leavening agent that helps the cookies rise slightly during baking, resulting in a soft and airy texture. It ensures that your cookies are not too dense. - 1/2 teaspoon salt
Salt balances the sweetness and enhances the overall flavor of the cookies. It plays an important role in bringing out the sweetness from the other ingredients. - 1 cup unsalted butter, softened
Butter contributes richness and flavor to the cookies, while its fat content helps achieve a soft, chewy texture. Softened butter ensures easy mixing and promotes even dispersion of ingredients. - 1 cup granulated sugar
Granulated sugar sweetens the cookies and aids in the texture by helping to create a tender crumb. It also plays a role in the browning process during baking. - 1 large egg
The egg acts as a binder, bringing together all the ingredients while adding moisture. It also contributes to the cookies' cakey texture. - 2 tablespoons milk
Milk adds moisture to the cookie dough, ensuring it stays soft and pliable. It also helps to enhance the overall flavor. - 1 teaspoon vanilla extract
Vanilla extract infuses the cookies with a warm, rich flavor that enhances their overall taste. It is a key ingredient that complements the cocoa and red food coloring. - 1 tablespoon red food coloring
Red food coloring gives the cookies their signature hue, making them visually distinct. It’s essential for achieving that classic red velvet appearance. - 1/2 cup cream cheese, softened (for filling)
Cream cheese provides a tangy, rich filling that contrasts beautifully with the sweetness of the cookie. Its creamy texture helps create a delightful contrast with the chewy cookie. - 1/4 cup powdered sugar (for filling)
Powdered sugar sweetens the cream cheese filling while allowing it to maintain a smooth consistency. It ensures that the filling complements rather than overpowers the cookie.
Directions & Preparation
Step 1: Preheat your oven to 350°F (175°C).
Preheating the oven is crucial for ensuring that the cookies bake evenly and develop the right texture. A properly heated oven helps the cookies rise correctly and sets their shape.
Step 2: In a mixing bowl, combine the flour, cocoa powder, baking powder, and salt.
Mixing the dry ingredients together ensures that the leavening agent and cocoa are evenly distributed throughout the cookie dough. This prevents any pockets of flavor or toughness in the final product.
Step 3: In another bowl, cream together the softened butter and granulated sugar until light and fluffy.
Creaming the butter and sugar incorporates air into the mixture, which is essential for the lightness of the cookies. The process also helps dissolve the sugar while merging it with the fat, resulting in a uniform texture.
Step 4: Beat in the egg, milk, vanilla extract, and red food coloring until well combined.
Adding the wet ingredients at this stage ensures that they are smoothly integrated into the creamed butter and sugar. This mixture should take on a smooth, vibrant hue thanks to the food coloring.
Step 5: Gradually add the dry mixture to the wet, mixing until combined but not overmixed.
Combining the dry and wet ingredients in batches prevents overmixing, which can develop gluten and lead to tougher cookies. The dough should be slightly sticky but manageable.
Step 6: Using a cookie scoop or tablespoon, drop dough onto a lined baking sheet, spacing them about 2 inches apart.
Proper spacing is important for even baking and allowing the cookies to spread correctly. This ensures they have enough room to puff up and maintain their shape.
Step 7: Using your thumb or the back of a spoon, make an indentation in the center of each cookie.
Creating an indentation is essential for holding the cream cheese filling. This step allows the filling to be featured prominently and adds to the visual appeal of the cookies.
Step 8: Bake the cookies for 10-12 minutes or until the edges are set.
Baking until the edges are set helps the cookies maintain their shape while ensuring the centers remain soft and chewy. Keep an eye on them to avoid overbaking.
Step 9: Allow the cookies to cool on the baking sheet for 5 minutes before transferring to a wire rack.
Letting the cookies cool slightly on the baking sheet prevents them from breaking apart during transfer. This step allows them to firm up just enough to handle.
Step 10: Meanwhile, in a small bowl, combine softened cream cheese and powdered sugar until smooth.
Mixing the cream cheese with powdered sugar creates a sweet, creamy filling that will sit beautifully in the thumbprint indentation. This mixture should be smooth to allow for easy piping.
Step 11: Once cooled, fill each cookie indentation with the cream cheese mixture.
Filling the cookies immediately after they cool ensures that the cream cheese will meld nicely with the warm cookies, enhancing the flavor and inviting aromas.
Step 12: Serve and enjoy your delicious red velvet thumbprint cookies!
These cookies are best enjoyed fresh but can also be stored in an airtight container. Each bite introduces a delightful combination of buttery cookie and tangy cream cheese.

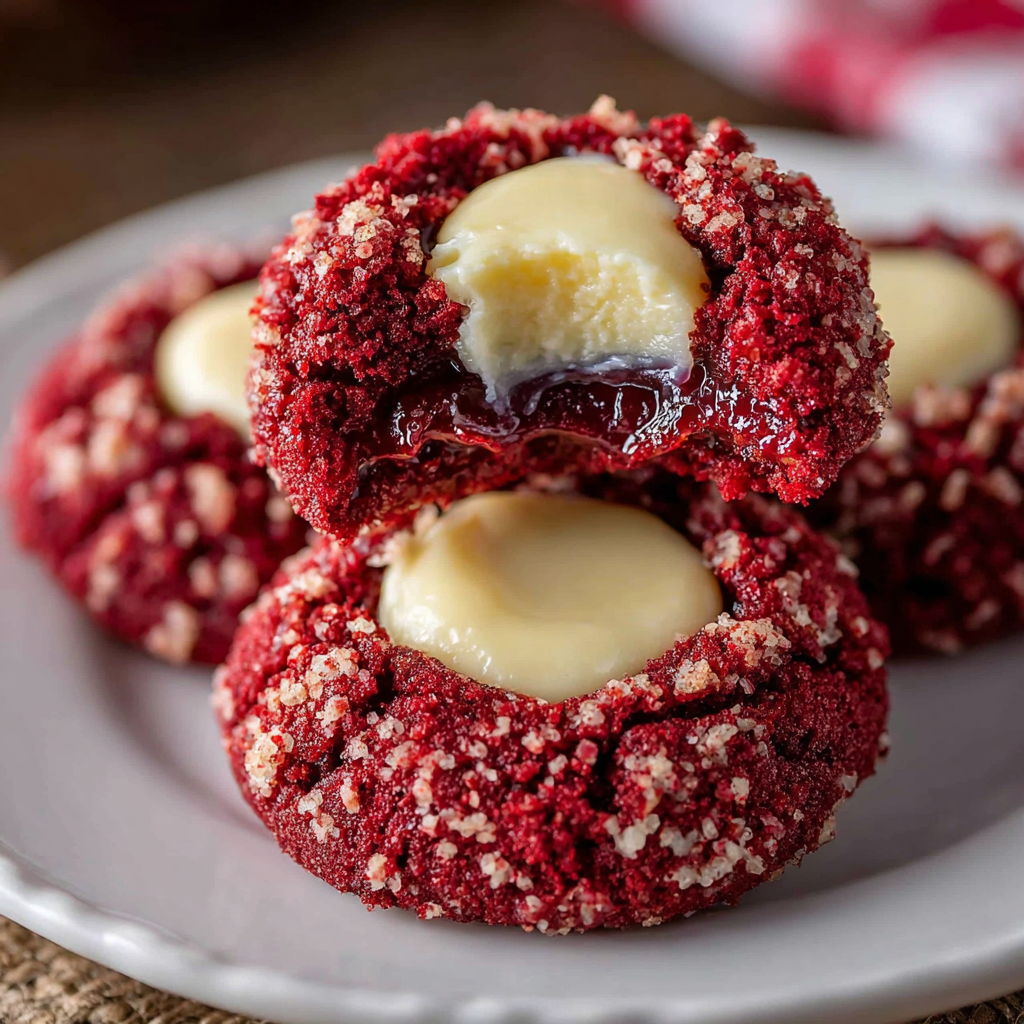
The Magic of Red Velvet Color
The vibrant red color of red velvet cookies is not only visually appealing but also signifies the special ingredients that make them unique. The reaction between cocoa powder and buttermilk creates a lovely flavor depth while the red food coloring brings everything to life, making these cookies perfect for celebrations.
Cream Cheese Filling Perfection
The tangy sweetness of the cream cheese filling is the star of these thumbprint cookies. Unlike traditional thumbprints filled with jam, this rich filling complements the soft, chewy cookie. Its silky texture balances the slight chocolate flavor of the cookie, creating a memorable bite worthy of any occasion.
Baking Tips for Chewy Cookies
To ensure your cookies are soft and chewy, focus on not overbaking them. Each oven is different, so use the edges of the cookies as your cue; they should be set but not too firm. Also, allow the cookies to cool on the sheet briefly to firm up before transferring, which helps retain that delicious chewy texture.
FAQs
What if my cookie dough is too thick?
If your cookie dough is too thick, try adding a splash more milk to loosen it up. Be careful not to add too much, as this can affect the texture.
Why are my cookies not spreading during baking?
Cookies may not spread if the dough is too cold or if you’ve added too much flour. Ensure the butter is softened properly and measure flour carefully.
What can I do to enhance the chocolate flavor?
To deepen the chocolate flavor, consider using dark cocoa powder instead of regular cocoa. You could also add chocolate chips to the dough for an extra boost.
Can I use an alternative for cream cheese?
Yes, you can substitute cream cheese with mascarpone or a non-dairy cream cheese spread if you're looking for a different flavor or dietary restriction.
What should I do if my cookies turn out bland?
If the cookies taste bland, ensure you’re using enough vanilla extract and don’t skip the salt. A touch of salt enhances flavors significantly.
Is it possible to make these cookies without food coloring?
Absolutely, you can skip the food coloring if you prefer. The cookies will still taste delicious, but they won't have the classic red velvet appearance.
Conclusion
Baking these soft and chewy red velvet thumbprint cookies is a rewarding experience that combines visual appeal with delightful taste. Whether for a festive gathering or a casual treat, their unique flavors make them a welcomed addition to any dessert spread.
With a luscious cream cheese filling and a tender cookie base, these cookies will undoubtedly impress friends and family. So roll up your sleeves, gather your ingredients, and enjoy the baking adventure!
Recipe Card
Deliciously Soft & Chewy Red Velvet Thumbprint Cookies
Ingredients
Method
- Preheat your oven to 350°F (175°C).
- In a mixing bowl, combine the flour, cocoa powder, baking powder, and salt.
- In another bowl, cream together the softened butter and granulated sugar until light and fluffy.
- Beat in the egg, milk, vanilla extract, and red food coloring until well combined.
- Gradually add the dry mixture to the wet, mixing until combined but not overmixed.
- Using a cookie scoop or tablespoon, drop dough onto a lined baking sheet, spacing them about 2 inches apart.
- Using your thumb or the back of a spoon, make an indentation in the center of each cookie.
- Bake the cookies for 10-12 minutes or until the edges are set.
- Allow the cookies to cool on the baking sheet for 5 minutes before transferring to a wire rack.
- Meanwhile, in a small bowl, combine softened cream cheese and powdered sugar until smooth.
- Once cooled, fill each cookie indentation with the cream cheese mixture.
- Serve and enjoy your delicious red velvet thumbprint cookies!
Notes
Additional serving suggestions: pair with a crisp salad, garlic bread, or roasted seasonal vegetables for balance.
For make-ahead, prep components separately and assemble just before heating to preserve texture.
Taste and adjust with acid (lemon/vinegar) and salt right at the end to wake up flavors.