Introduction
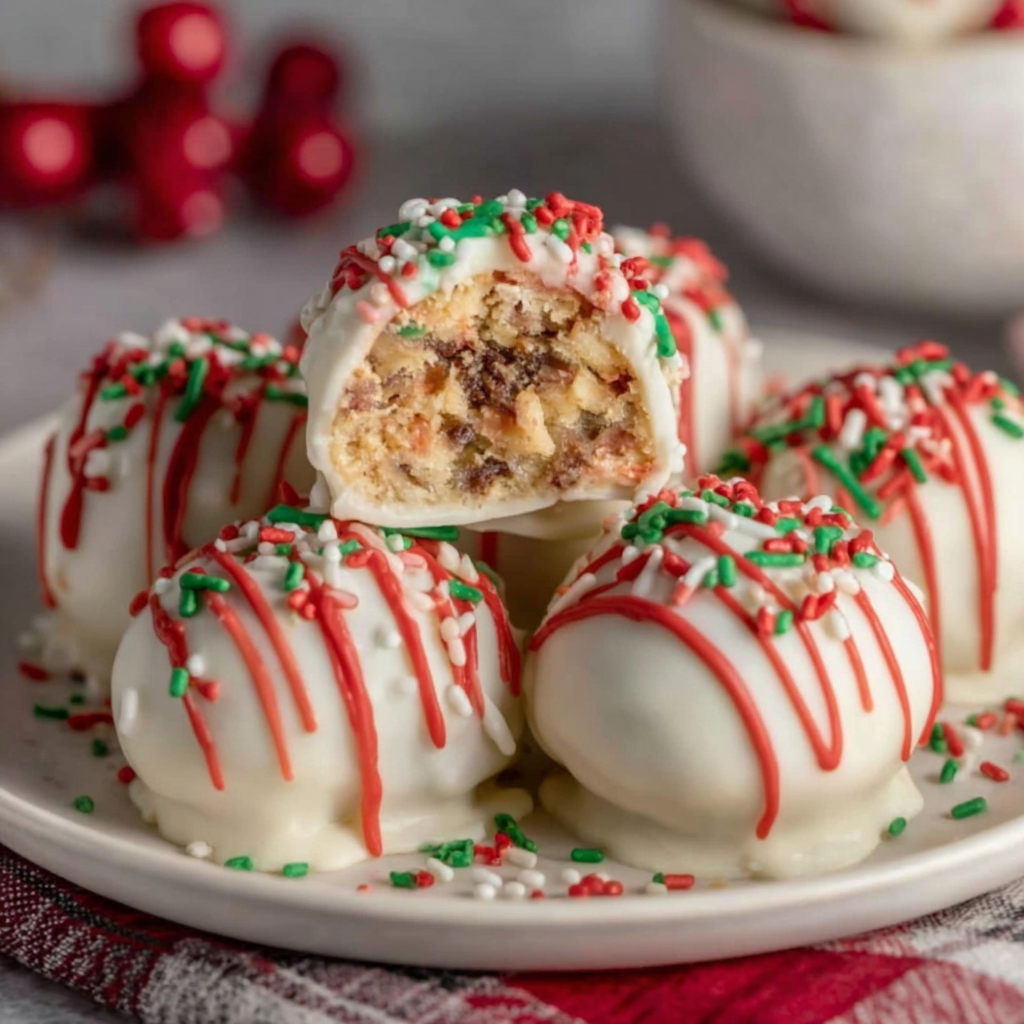
The holiday season is a delightful time for creating sweet treats, and what better way to celebrate than with Little Debbie Christmas Tree Cake Truffles? These delectable bites offer a deliciously fun twist on the classic holiday treat that many have come to love.
Whether you are hosting a festive gathering or simply indulging in some seasonal joy, these truffles encapsulate the flavors of the beloved cake while providing an easy and enjoyable preparation. With their creamy filling and chocolate coating, they make for the perfect addition to your dessert table.
While they may look and taste impressive, making these truffles requires just a handful of ingredients and some simple methods. Let's mix up some holiday cheer and learn how to craft these delightful truffles.
Ingredients
- 1 box Little Debbie Christmas Tree Cakes (10 cakes)
These iconic cakes are the foundation of the truffles, providing the rich flavor and festive colors. Their soft texture makes them easy to blend into a creamy filling. - 8 oz cream cheese, softened
Cream cheese brings a delicious tanginess to the filling and helps bind the crushed cake together. Its creamy consistency allows the truffles to maintain a smooth texture. - 1 cup white chocolate chips
White chocolate coats the truffles, adding sweetness and a beautiful finish. It melts easily, making it ideal for dipping and creating a glossy outer layer. - 1 tsp vanilla extract
Vanilla enhances the flavor profile, complementing the sweetness of the cake and chocolate. This natural addition contributes to a more rounded and aromatic taste. - Red and green sprinkles, for decoration (optional)
Sprinkles not only add a festive touch to the truffles but also give a textural contrast. They make the finished product visually appealing and perfect for holiday celebrations.
Directions & Preparation
Step 1: Crush the Little Debbie Christmas Tree Cakes into fine crumbs.
Begin by crushing the cakes into fine crumbs. This step is crucial because the finer the crumbs, the smoother your truffles will be. Use a food processor for even grinding, or place the cakes in a zip-top bag and crush them with a rolling pin. Ensuring that there are no large chunks will help in achieving a uniform texture.
Step 2: In a mixing bowl, combine the cake crumbs and softened cream cheese.
After crushing the cakes, combine them with the softened cream cheese in a large bowl. This mixture will form the base of your truffles. Use a spatula to mix thoroughly, ensuring that the cream cheese is fully integrated, creating a moist and cohesive dough.
Step 3: Stir in vanilla extract until evenly mixed.
Incorporating vanilla extract will enhance the overall flavor of the filling. Blend it in thoroughly to ensure it's distributed evenly throughout the mixture, providing a warm, inviting aroma and taste in each bite.
Step 4: Shape the mixture into small balls and place on a baking sheet.
Once well mixed, take small portions of the dough and roll them into balls about one inch in diameter. This shaping step is essential for ensuring uniform truffles, which will help them set evenly in the refrigerator. Place them on a parchment-lined baking sheet for easy transfer.
Step 5: Chill the truffles in the refrigerator for about 30 minutes to set.
Chilling the truffles allows them to firm up, making them easier to coat in chocolate later. This step is key to ensuring that the truffles hold their shape during the dipping process. A firmer texture makes for a satisfying bite.
Step 6: Melt the white chocolate chips in a microwave-safe bowl or double boiler.
Melting the chocolate is the next crucial step. Ensure that you do this carefully, as overheating can cause the chocolate to seize. Stirring every 30 seconds in the microwave will lead to a smooth and creamy coating for your truffles.
Step 7: Dip each truffle into the melted chocolate and coat evenly.
Carefully dip each chilled truffle into the melted chocolate, using a fork to lift and allow excess chocolate to drip off. This step is important for achieving a lovely, thick coating, which adds flavor and a visual appeal to your truffles.
Step 8: Sprinkle with decorative sprinkles immediately after dipping.
Adding sprinkles while the chocolate coating is still wet ensures that they adhere properly. This final touch not only enhances the festive presentation but also adds a crunchy texture, making your truffles visually appealing.
Step 9: Let the truffles cool completely on the baking sheet before serving.
Once coated, let the truffles set at room temperature or in the fridge until the chocolate is firm. This cooling step is essential for preserving the integrity of the truffles, allowing them to be enjoyed as a perfect bite-sized treat.

Creative Variations to Try
For those looking to add a personal touch, consider mixing in different flavors or textures. Try incorporating crushed peppermint candies for a refreshing twist or rolling the truffles in cocoa powder for a rich chocolate experience. These variations can make your truffles stand out while celebrating the essence of the iconic Christmas cake.
Presentation Ideas for Festive Parties
To elevate your holiday gatherings, think about how you present your truffles. Use decorative tins or plates, and consider placing them in festive cupcake liners. A beautiful arrangement can make your truffles the centerpiece of your dessert table, captivating your guests even before they take a bite.
Pairing Ideas for Sweet Treats
While these truffles are delectable on their own, pairing them with complementary flavors can enhance the tasting experience. Consider serving them alongside a rich cup of hot cocoa or a spiced chai latte. The warm beverages offer a lovely contrast to the chilled truffles, making every bite enjoyable.
FAQs
What should I do if the truffle mixture is too thick?
If your mixture is too thick, check if you’ve crushed the cakes finely enough. Adding a small amount of softened cream cheese can help achieve the right consistency.
How can I achieve a more vibrant flavor in the truffles?
Adding a splash of almond extract can deepen the flavor profile, enhancing the taste experience beyond the vanilla while keeping the festive spirit.
Is it possible to adjust the size of the truffles?
Certainly! You can scale the truffles to your liking. Just remember that smaller truffles will require less chilling time, while larger ones may need a few extra minutes.
What can I do if my chocolate coating is too thick?
If your chocolate coating is too thick, add a small amount of coconut oil or shortening to thin it out. This will help achieve a smoother dipping consistency.
What if I want to include nuts in my truffles?
Chopped nuts can add a lovely crunch to your truffles. Simply fold in finely crushed nuts into the mixture before shaping them into balls.
Can I use a different type of chocolate for coating?
Yes, you can use dark or milk chocolate instead of white chocolate. Keep in mind that this will change the flavor profile but provide a delightful alternative.
Conclusion
Creating Little Debbie Christmas Tree Cake Truffles is an enjoyable project that encapsulates the joy of the holiday season. These sweet treats are not only delicious, but they also bring a sense of nostalgia and celebration to your gatherings.
Whether shared with family or gifted to friends, they are sure to elicit smiles and warm wishes. Embrace the holiday spirit in your kitchen and enjoy every bite of these delightful truffles.
Recipe Card

Delightful Little Debbie Christmas Tree Cake Truffles
Ingredients
Method
- Crush the Little Debbie Christmas Tree Cakes into fine crumbs.
- In a mixing bowl, combine the cake crumbs and softened cream cheese.
- Stir in vanilla extract until evenly mixed.
- Shape the mixture into small balls and place on a baking sheet.
- Chill the truffles in the refrigerator for about 30 minutes to set.
- Melt the white chocolate chips in a microwave-safe bowl or double boiler.
- Dip each truffle into the melted chocolate and coat evenly.
- Sprinkle with decorative sprinkles immediately after dipping.
- Let the truffles cool completely on the baking sheet before serving.
Notes
Additional serving suggestions: pair with a crisp salad, garlic bread, or roasted seasonal vegetables for balance.
For make-ahead, prep components separately and assemble just before heating to preserve texture.
Taste and adjust with acid (lemon/vinegar) and salt right at the end to wake up flavors.