Introduction
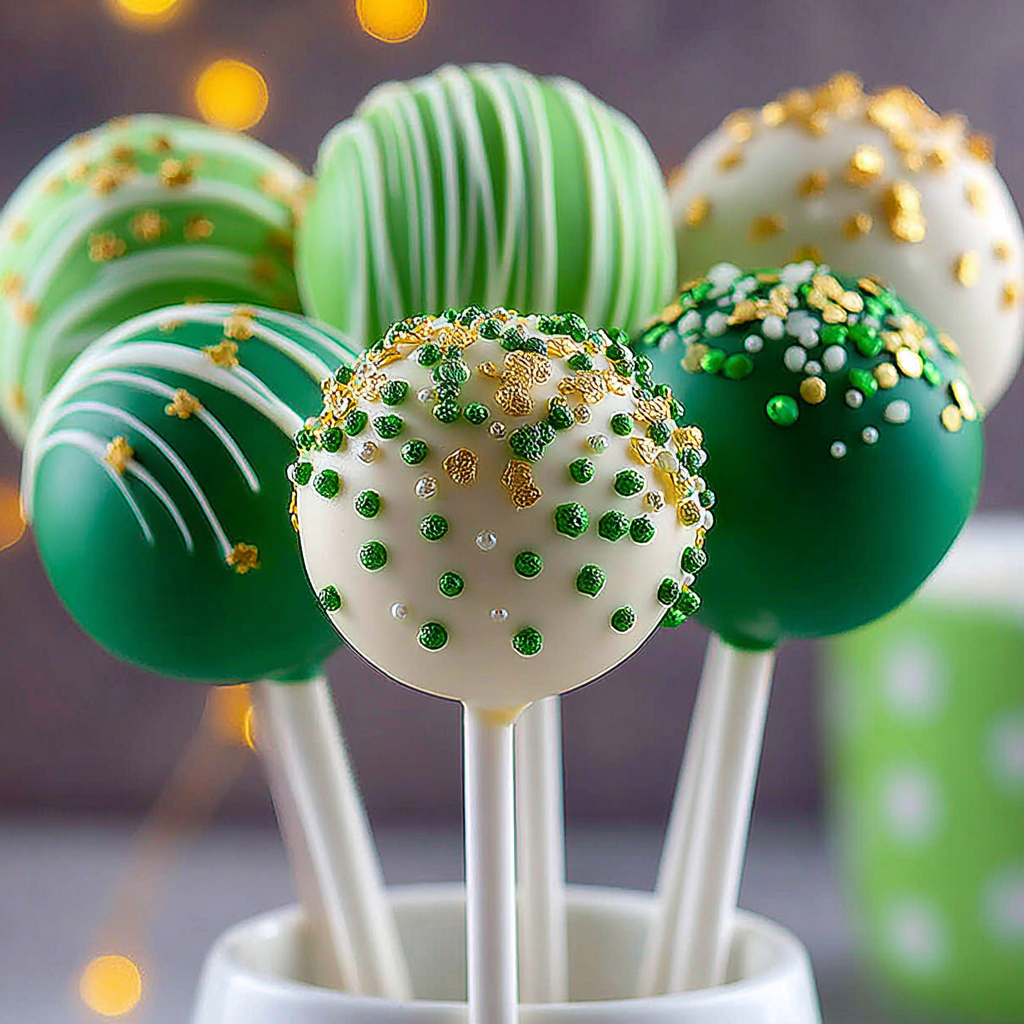
As St. Patrick’s Day approaches, the anticipation for lively celebrations and delicious treats grows. Among these, St. Patrick’s Day cake pops have quickly become a beloved choice, enchanting both children and adults alike with their festive flair and sweet flavor. These delightful confections not only embody the spirit of the holiday but also provide a fun, interactive way to indulge in desserts.
Creating cake pops is an easy yet creative process that transforms simple ingredients into charming treats. Coated in vibrant colors, they can be decorated to represent various aspects of the holiday, such as shamrocks, leprechauns, and rainbows. With just a bit of effort, home cooks can craft these whimsical sweets that are perfect for parties, gatherings, or even as gifts.
In this article, we will explore the process of making these festive cake pops from scratch. With a focus on quality ingredients and creative decoration, you’ll be ready to impress your guests with this playful addition to your St. Patrick’s Day celebration.
Ingredients
- 1 box yellow cake mix
This forms the base of your cake pops, providing a light and fluffy texture. The yellow cake adds a sweet flavor that pairs well with various coatings and decorations. - 3 large eggs
The eggs contribute moisture and richness to the cake, enhancing its structure. They help bind the ingredients together and create a tender crumb. - 1/2 cup vegetable oil
Oil adds moisture and helps the cake pop remain soft. It prevents dryness, ensuring that the cake pops are irresistible and flavorful. - 1 cup water
Water is mixed with the cake mix to activate the dry ingredients. It ensures the batter reaches the right consistency for baking. - 1 cup cream cheese frosting
Frosting is key to binding the crumbled cake together. It not only adds flavor but also gives the pops a moist texture. - 2 cups white chocolate chips
These chips are melted to create a smooth coating for the cake pops. The sweetness of white chocolate complements the cake and adds a luscious layer. - Green food coloring
Food coloring is essential for achieving the iconic St. Patrick’s Day green hue for the cake pops. Just a few drops create a festive appearance. - Sprinkles or edible decorations
These are used to enhance the visual appeal of your cake pops, allowing for creativity and fun in decoration. They can represent various holiday themes. - Lollipop sticks
These sticks provide a handy way to hold the cake pops, making them easy to handle and serve. They also add to the playful presentation.
Directions & Preparation
Step 1: Bake the cake according to package instructions.
Start by preheating your oven and preparing a baking pan as instructed on the cake mix box. Baking the cake properly is crucial to achieve a fluffy texture, so follow the time and temperature guidelines. Ensure the cake cools completely before proceeding to the next step to make handling easier.
Step 2: Crumble the cooled cake into a large bowl.
Once the cake has cooled, break it into small crumbs using your hands or a fork. This step creates the consistency needed to form cake balls. Make sure there are no large pieces, as uniform crumbs will help the cake pops hold their shape.
Step 3: Mix in the cream cheese frosting until well combined.
Add the cream cheese frosting to the crumbled cake. This is where the magic happens; the frosting binds the crumbs together, forming a dough-like consistency. Use your hands to combine thoroughly, ensuring every crumb is coated for optimal flavor and moisture.
Step 4: Form the mixture into 1-inch balls and place on a lined baking sheet.
Scoop out portions of the cake mixture and roll them into small balls. The size is important as it affects presentation and eating ease. Once shaped, place them on a baking sheet lined with parchment paper to prevent sticking during chilling.
Step 5: Chill the cake balls in the refrigerator for at least 30 minutes.
Chilling firms up the cake balls, making them easier to dip into the chocolate coating. This step is crucial as it prevents the cake pops from falling apart when inserted into the lollipop sticks.
Step 6: Melt the white chocolate chips in a microwave-safe bowl.
Gently melting the chocolate ensures a silky coating. Use short increments in the microwave, stirring in between to prevent overheating. Properly melted chocolate is essential for an even coating and shiny finish.
Step 7: Dip the end of the lollipop stick into the melted chocolate and insert into each cake ball.
This step helps anchor the stick and prevents the cake pop from falling off. The melted chocolate acts as glue, so ensure it coats the stick well before inserting it into the center of each chilled cake ball.
Step 8: Coat each cake ball with melted chocolate, then tap off excess chocolate.
Fully submerge each cake ball in the melted chocolate. Tapping off the excess is important for a smooth finish and prevents the coating from becoming too thick, which could lead to a less appealing presentation.
Step 9: Decorate with sprinkles or edible decorations while the chocolate is still wet.
Adding sprinkles while the chocolate is wet ensures they adhere properly. This is your chance to get creative and festive, so don’t hesitate to have fun with your decorations, making each cake pop unique.
Step 10: Let the cake pops cool until the chocolate hardens completely.
Place the decorated cake pops upright in a foam block or a glass to cool. This position ensures they maintain their shape while the chocolate hardens, resulting in perfectly formed cake pops.

Incorporating Traditional Flavors
To add a unique twist to your St. Patrick’s Day cake pops, consider incorporating traditional Irish flavors. Adding whiskey or Irish cream liqueur into the cake mix can subtly enhance the flavor profile. A touch of dark chocolate may also be included in the mix for those who enjoy a richer taste. Experimenting with flavors can make your cake pops memorable and truly festive.
Creative Decoration Ideas
The fun part of making cake pops is getting creative with decorations. Using chocolate melts instead of white chocolate can yield colorful results when dyed, adding extra dimension to your pops. You can also create themed designs, like little leprechauns or pots of gold using candy and fondant. Utilizing your artistic flair can make this treat standout on any dessert table.
Perfecting Your Cake Pop Technique
If you’re new to cake pop making, mastering the technique takes practice. Ensure that the cake balls are uniformly sized for even coating and chilling. Avoiding overmixing the cake and frosting helps achieve the ideal consistency. As you become more comfortable with the process, you will develop your style, enabling you to create show-stopping cake pops without much hassle.
FAQs
Can I use different cake flavors for my cake pops?
Absolutely! Feel free to substitute the yellow cake mix with any flavor you prefer, such as chocolate or red velvet, to create various taste profiles.
What should I do if my cake mixture is too dry?
If your cake mixture feels dry and isn’t holding together well, consider adding a bit more frosting or a splash of milk to help bind it.
Is it necessary to use cream cheese frosting?
While cream cheese frosting adds a delicious tang, you can use any frosting type, such as buttercream or chocolate frosting, for different flavors.
How can I prevent the chocolate from cracking on my pops?
To avoid cracking, ensure the cake pops are chilled adequately and let the melted chocolate cool slightly before dipping.
Can I use a different type of coating instead of chocolate?
Sure! You can coat cake pops with candy melts or even tempered chocolate to achieve a variety of finishes and flavors.
How do I keep my cake pops from falling off the sticks?
Make sure to let the cake balls chill properly before inserting the sticks, and dip the tip of each stick in melted chocolate for a secure hold.
Conclusion
St. Patrick’s Day cake pops are a delightful way to celebrate the holiday. Their vibrant colors and delicious flavors bring joy to gatherings and can be a great activity for family members of any age. With the right ingredients and a pinch of creativity, you can easily create stunning dessert treats that are not only fun to make but delightful to eat.
Whether you’re making them for a party or just to enjoy at home, these cake pops add that festive touch to your St. Patrick’s Day celebrations. So gather your ingredients and start crafting these charming confections to spread cheer to your loved ones this holiday season.
Recipe Card

Delightful St Patrick’s Day Cake Pops for Celebrations
Ingredients
Method
- Bake the cake according to package instructions.
- Crumble the cooled cake into a large bowl.
- Mix in the cream cheese frosting until well combined.
- Form the mixture into 1-inch balls and place on a lined baking sheet.
- Chill the cake balls in the refrigerator for at least 30 minutes.
- Melt the white chocolate chips in a microwave-safe bowl.
- Dip the end of the lollipop stick into the melted chocolate and insert into each cake ball.
- Coat each cake ball with melted chocolate, then tap off excess chocolate.
- Decorate with sprinkles or edible decorations while the chocolate is still wet.
- Let the cake pops cool until the chocolate hardens completely.
Notes
Additional serving suggestions: pair with a crisp salad, garlic bread, or roasted seasonal vegetables for balance.
For make-ahead, prep components separately and assemble just before heating to preserve texture.
Taste and adjust with acid (lemon/vinegar) and salt right at the end to wake up flavors.